Blog Header

Wednesday, February 29, 2012

Another piece of Furniture!

Okay, so I'm loving painting furniture and making it look distressed and different. This particular piece was a pie safe with tin inserts. I took them out, papered the inside, and then painted and distressed the outside. I even added real glass to the windows. I love how it looks and wish I had one in real size. Why don't I have a blow up machine?


Tuesday, February 28, 2012

My First Piece of Furniture

Okay, so I didn't actually make this hutch, but I did do the paint job. I love Michael's hutches, but I think they stopped carrying them. At least at the Michael's by me. Anyway, I think it turned out rather shabby and it will go perfectly in the Cherry Cottage Boutique. I love the crystal knobs that I made out of swarovski crystals with pink paint in them. I also made the lotion jars on the hutch, out of beads and paint. They have mini little vintage lotion labels as well. I made the little boxes too, but I haven't labeled them. I have to come up with something to put in them first. The tinsel tree I also made, but I can't remember where I got the idea. I think I'll make it a little fuller though, next time around. I need more branches for cute ornaments. I've got plenty of space to fill in just this hutch. Better get to work.

This shows where it will be placed in the Cherry Cottage Boutique

Monday, February 27, 2012

Victoria's Farmhouse by Real Good Toys

And the final dollhouse that I own right now is the Victoria's Farmhouse by Real Good Toys. This is my baby. It's hard to have a dream dollhouse because I love so many styles, but this is my ultimate dollhouse. It's pretty big, for me anyway. I've seen lots of big dollhouses, but this is the biggest I think possible for me to undertake. I've been working on it for over a year in my spare time and I'm just about finished with the outside. The shingles still need to be added of course, and then I need to finish up the foundation (egg carton stones), and touch up paint and trim. I also need to stain the front door a wood color, and add the board and batten to the eaves.

Sorry for all the debris in the pictures. I'm messy when I work on my dollhouses.

My vision for this dollhouse is to finish it in current day interior design. That means I will have to make a Victorian dollhouse some day because I've always wanted one. However, it scares me to make things in period, since I don't know much about the Victorian era.

A family will live in this house. They have a mom and dad, a baby girl, a brother, and a sister.


As you can see, I have changed quite a bit from the original kit. There are certain things I like to include in my dollhouse and the original kit didn't allow for it. I think I secretly find pleasure in kit bashing also. I'm never satisfied with the original design.

I added windows to the attic rooms, and created more space in them by raising the back to be room height. I also added the whole side addition, which includes a formal dining room, a nursery, and then a craft/guest room (that's the plan right now anyway). A side panel towards the front opens to reveal the living room and the master bedroom. I also made the roof open on the front eave so I could have a room in there as well. That will be the boys room. I also put a roof where the upper porch was supposed to be, because it seemed more charming and farmhouse-y to not to have a balcony. I also added the roof (it's just taped in place for now) over the bay window because it seemed weird to just have a large flat area.


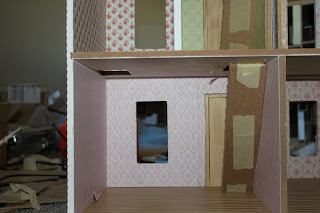
Some of the walls are missing (they're built, I just forgot to put them in for this photo because I was in a hurry), but I'll try to explain the floor plan as best I can. My daughter also put all the furniture in the house as well as some of her toys, so I will try to get a better picture of the house set up the way it's supposed to be asap. You'll have to use your imagination for now.

From left to right starting at the bottom, we have the laundry/mud room first. This is where you see the French door which opens into the side backyard. The other door opens to the porch. Next to the laundry room is the entry way with stairs. From the entry way, you can enter the living room (the door is behind the stairs next to the front door), or go into the kitchen at the back. There will be a wall separating the two. Next to the kitchen is the formal dining room, which can also be accessed through the living room by a single French door.

The second floor from left to right has a study/library. The door leading off of this room will enter a little hall that is only like 3" square. A door on the left will enter into the master bedroom in the front of the house, and a door on the right will enter into the bathroom. From the master bedroom, there is a door that leads into the nursery. I hope that all makes sense. I'll have to stage it better so that it does.

Anyway, the upper floor from left to right starts with the daughters bedroom. The lucky girl gets the large dormer and all the charming roof angles. Next to that is the family room, and next to that is the craft/hobby room and maybe guest room. In the front of the house (the door leading off of the family room) is the boys room. I may possibly make that the guest room and not have a boy, but I have some fun ideas for a boys room that I want to use. So we shall see. Maybe I'll make a room box for the boys room :).

So that's the tour at a glance. I've started the round wiring and am about half way done (it's a lot of work for a house this huge, especially since I've never wired a house before), but I think I may pause on that and just make the floors removable, so I can finish the lighting with each room, instead of doing it all at once.

Wow, it looks overwhelming. But if I just do a little at a time, it will slowly get done. I'm very pleased with the way it's turning out.

So that's my final house. I'm sure it won't be the last. I seem to switch from house to house as I work on things, so the posts are sure to be random as work progresses.


I feel like I have been so welcomed into the miniature world already with so many followers. Everyone has been so nice in their comments and I love all of your blogs. You are what inspires me to keep going. Thank you!

Sunday, February 26, 2012

Alison Jr. by Real Good Toys

Dollhouse #5 is the Alison Jr. by Real Good Toys. I bought this dollhouse for my daughter just recently (she begged for pink). That's why it's a miracle that it's almost finished. I think I was able to get more done on it since it wasn't going to be for me, and that meant I didn't have to be Miss Perfectionist (which none of my stuff is perfect, but I wish it was). I've taped it together in the following pictures, so nothing is glued together yet except the foundation. I wanted to make sure the adjustments I made lined up and that the wallpaper was in the right place. I've learned that it's easier to wallpaper before things are glued in place. It took me three other dollhouses to learn this.

I had to kit bash, because it's just more fun that way. I thought centralizing the front door was better and it was also better since I moved the stairs. Moving the stairs allowed me to make the bathroom and nursery separate rooms with doors, as well as more appropriately sized for their use. I was able to make a bigger master bedroom as well on the third floor, which is also a bonus. I still need to make the walls a little less rough on the third floor hall. Measurements somehow changed when I put the house together again.

The nice thing about this house was that the floors came already finished. That's a good thing, but it also has it's problems. Since I moved the stairs, I need to figure out how to patch the old hole so it's not very noticeable. That will be easy on the ceilings, but I'm thinking I'll have to just cover the floor where the patch is in the bathroom and nursery. I might put tile in the bathroom and carpet in the nursery. That, or giant rugs. The other problem with the floors is I can't round wire the house very easily because I like running the wires through the floors. Since this is my daughters house, I might just makeshift lights that run on batteries or I'll have to try the tape wire method.

I also added a door on the second story balcony. What's the point of a balcony if you can't access it? And the tower will be a little reading library nook that you can access by a ladder through a small opening from the master bedroom.

What fun I have ahead of me! I need to glue the house together once I finalize everything, and then finish windows, add trim and moldings, and shingle it. Shouldn't be too hard, right? ;)

I wasn't very careful cutting out the door for the second floor. I'll have to patch that, as well as a few other things.


The wall divider fell over in the kitchen, but I'm debating whether I should put the two available in at all. They make the dining alcove feel a little more separate, but they also take up room in a small space.

From left to right, the first floor has the living room, small dining alcove at the front of the house, and then the kitchen. The second floor is the bathroom, hall, and spare room (I'll let DD figure out what she wants to do with it). The third floor is the nursery, hall, and master bedroom. And then the tower, which you can't see in this picture.

(Because of the houses location, it was hard to get a good picture)


Saturday, February 25, 2012

My Shabby Cottage- The Orchid by Greenleaf

So this is my Cherry Cottage Boutique and the third in my dollhouse lineup. It's the Orchid by Greenleaf kit. And this kit also makes my fourth dollhouse as well. I bought two of the kits, knowing right away that I wanted to make one into this boutique. The other I'm still not sure about. I thought about a witch's cottage for Halloween, or maybe a Christmas house. We shall see.

As usual, it's not quite finished. Shingles seem to intimidate me. I don't know why, but it's the part I procrastinate. I think it needs one more coat of paint. I couldn't tell that until seeing it on camera. I might paint the door white. Not sure if the green is the look I'm going for.


You can see that the floor sags. I need to put some pillars in the middle to hold it up. I plan on having a glass counter with goodies in it, where customers also check out. I will have two to three different hutches full of wonderful little minis, and then I will also have a little table with two chairs, so tiny people can eat the yummy desserts available in my boutique. Upstairs will be the owner's office and a place to sleep in the little alcove over the porch. It will also have a bathroom.

Thursday, February 23, 2012

Southern Mansion Dollhouse by Dura-Craft

Up next is the Southern Mansion by Dura-Craft. I don't have any pictures of it unfortunately, because I haven't even began to put it together. I took it out of the box to make sure all the parts were there (they seemed to be, but I think they were labeled wrong. We shall see when I officially put it together), and put it all back again for another day. I hope to make it into a bed and breakfast. It's the perfect house for it.

Wednesday, February 22, 2012

The Linfield by Duracraft

The first on the list is the Linfield by Duracraft. This is the house that my parents gave to me and it sat in the box until after I was married. Well, that's actually not true. I did pull out all the pieces and looked at it for hours (dreaming), and even finished the base (stonework and all) before putting it back in the box and placing it under my bed for several years.


After I got married, the bottom of the house got smashed in a move and sat in the back of my husband's truck for quite some time, becoming subject to all sorts of weather. I revived it the best I could and began work on it again. I painted it the colors that are shown on the outside of the box, but ended up not liking it. So it got repainted as well. The point is, this house has been through a lot, so it's a miracle that it's still around.

This is my shabby chic house. I love shabby chic and knew one of my houses had to be dedicated to the style. That's why I re-painted it blue and white. I have the hardest time making decisions on colors and wallpapers. I love the colors I have picked for the outside, but I still can't decide on the inside. I'm not even sure I like the living room wallpaper, but this is the second time I've papered it and I'm not changing it for now. As you can see, the dining/kitchen is also being stripped of it's wallpaper. I haven't decided on the new paper yet. I'm thinking I'll keep with a rose theme for the walls. That's very shabby.


The floors look a lot better than this when they are clean. There is just a lot of construction debris on them right now. Time to clean house.


I had to include the first pitcher I ever made. It will most likely end up in this room. I got the tutorial from Marlies. I love the way it turned out. I'm not that great at making miniatures because I lack the patience, but I've loved everything I've made so far. Now I've got to learn to make flowers to fill the pitcher.


As you can see, there is still a lot to be done with this house. I like to imagine the tenants of each house as I build it, and this one I've decided belongs to a single girl (there's not much room for anyone else). She loves shabby chic style, and that's all I know about her right now.

Welcome!

Okay, so I know there are a lot of dollhouse blogs out there (I've been stalking them for months), but I felt a need to make my own. I have been a dollhouse guru since I was about 8 years old, when I built my first dollhouse out of clay in my second grade art class. After that, I built several dollhouses out of cardboard boxes that I begged my brother to bring home from his work. My parents finally gave me my first real dollhouse kit for Christmas at the age of 14. You think they would have caught on sooner. Better late than never. You're never too old for a dollhouse, luckily :). Miniatures combine my passion for architecture and creating. I thought about being an architect at one point, but am satisfied with the occasional house design, and my dollhouses. I have six dollhouses as of right now and my husband is forbidding me to buy another one until I finish them. I think that's a good thing. I credit my love of dollhouses to my aunt who had her own dollhouse that she built from scratch. I loved playing with it whenever we visited her.

So, welcome to my blog, and in the next few posts, I shall introduce my dollhouses.